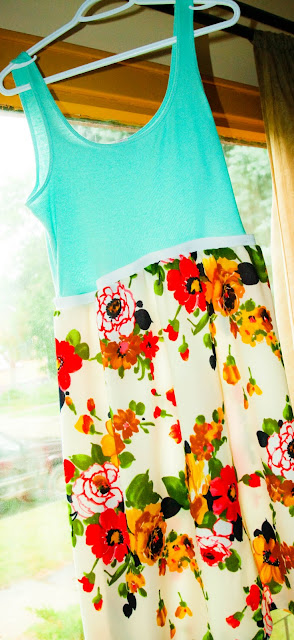
Nice to be back guest blogging on My Sisters Closet again! While Jordyn is off away on a girls weekend with her momma bear, i get to show you a little craft that i had accomplished this past week.
I actually had my first attempt at making a dress. A tank top dress at that. Makes it a little easier and means the top part is already done for you.
All you need to make your own customized and cheap summer dress is:
1. A tank top ( i had many that arent long enough to fit over my baby bump right now so i had many colours to already choose from)
2. Yard of fabric (approx depending on your size)
3. elastic (all the tutorials i read say use 2 inches, but i only had an inch wide elastic and it was from the dollar store so i was sticking with my cheapy budget. But i would suggest going for a wider band.
STEP ONE!
Definitely need a lot of pins, you can grab them from anywhere at a cheap cost. It will help with the hemming of your fabric and if you want to pin your tank to the elastic.
STEP TWO!
Choose your tank top and i put mine on so i could decide how far up i wanted my top to end. I had mine further up because a) i like high waisted dresses, and b) i have a baby bump, so its totally up to you where you want the hemline to sit.
Make sure you leave a half inch for you to sew it to the elastic.
DO NOT SEW THE TANK TOP TO ELASTIC FIRST
STEP THREE
Your chosen fabric should be the first thing sewn to the elastic. Make sure you measure the elastic to how big it needs to go round your waist, make it a little smaller, as it obviously will stretch.
I chose a stretchy fabric, and i would NOT do that again. Use a none stretchy fabric so when you stitch your fabric to the elastic when you loosen the elastic again after stitching it will create cute pleats and gives some dynamic to your skirt.
STEP FOUR
As you sew your fabric to the elastic, stretched out the elastic as you sew, and you will see that the fabric gathers nicely. Then stitch the skirt together to get complete the bottom half. You wont need a zipper or buttons as its elastic and should stretch easily over the body
STEP FIVE
Sorry i don't have a picture, i forgot to take one to show you what it looks like as a skirt part.
You now need to hen your fabric. About half an inch will do. Or you may want to shorten your skirt to the desired length and then sew it!
STEP SIX
Now to attach the tank top. You may want to pin for this to make sure that you get the tank attached the whole way round.
Now get sewing.
I didnt bother with sewing it inside out as my thread was same colour as elastic and you cant tell, and i presumed i would sometimes wear a belt over the elastic too anyways.
Heres my finished product!
I found this fabric at the local thrift store, and i just love how vintage it is! Because its stretchy fabric i am going to have to take my skirt part in a little, but you shouldnt need too it is not elasticated fabric!
Hope you give this a go!
Go over to the store in Estevan to grab a cute pair of earrings or necklace to go with it!
Thanks for having me over again Jordyn! Have a great weekend!
Much love
Dani @ www.12stonedance.blogspot.com


No comments:
Post a Comment